
Typically an enterprise application interacts with internal and external systems to fulfill the business needs. Such integrations can happen at the UI layer or business layer or at the data layer in a synchronous/ asynchronous way.
Synchronous service integration with external systems happens over a web service, primarily with HTTP as the preferred protocol. Asynchronous integration happens with File transfer, primarily with SFTP (Secure File Transfer Protocol) as the preferred protocol.
Mutual Authentication (two-way SSL) is one of the standard techniques used to secure, encrypt and authenticate web services/ APIs. In 2-way SSL authentication, the client stores server certificates, and the server stores client certificates which are used to authenticate and validate each other’s identities. This is typically done on the server configuration.
“Nearly half of new apps at Amazon were deployed to AWS Lambda in 2020” – Andy Jessy at AWS:reInvent 2020
The announcement by Andy Jessy in AWS:reInvent confirms the rapid growth and interest in Serverless compute.
Implementing 2-way SSL authentication is a challenge in serverless since physical access to servers is not feasible. This blog provides a solution to establish a 2-way SSL communication between a serverless AWS Lambda function (the consumer service) and an external web service (the provider service).
Architecture:
AWS Lambda lets you run code without provisioning or managing servers. Customers pay only for the compute time that they consume. AWS manages the underlying compute needs for customers. AWS Lambda provides continuous scaling, subsecond metering, and consistent performance. AWS Lambda frees the customers from managing, securing, patching servers, and not worrying about spare or unused compute capacity. AWS Lambda is integrated with multiple AWS services like S3, ELB, API gateway, etc to help customers build secure loosely coupled microservices faster with less cost.
The architecture depicted below is a high-level architecture of a chat engine built with Amazon Lex. The focus in this architecture is the integration between AWS Lambda (the consumer service) and Appointment API (the provider service). A secure communication has to be established between these services for secure data transfer.

A Lambda function is built on Java 8 to call the Appointment API via Mulesoft API gateway. Java function authenticates with Mule via two-way SSL.
Tools and Technologies:
Here are the tools and technologies used to build the AWS Lambda function.
- Java 8
- AWS Lambda
- Eclipse Neon
- Maven 4.0
- SoapUI 5.5.0 or above
Pre-requisite:
Install SoapUI to test the Appointment API. This is to ensure that the Appointment API that you are planning to call from the AWS Lambda function is accessible over the network. Obtain the Java Key Store (jks) file and password phrase from the Appointment API owner and validate it using SoaPUI.
1. Open SoapUI, Click Preferences on the main toolbar, or select File > Preferences.
2. In the SoapUI Preferences dialog, switch to the SSL Settings tab.
3. Specify the full path to your Keystore file and the Keystore password

4. Create a SOAP project, pass any additional credentials required in the header for authorization and invoke the API with a valid request. You should be able to successfully invoke the API and get results.
Build, Deploy and Test:
Here are the steps to build, deploy and run the Lambda function
Step 1 : Create a Maven Project
Create a new java Maven project in Eclipse for AWS Lambda function. Include AWS Lambda java core (required to run on AWS Lambda) and Apache HTTP client (to establish HTTP connection) libraries into the project. Sample POM.xml file is given below.

Step 2 : Create Lambda function in Java
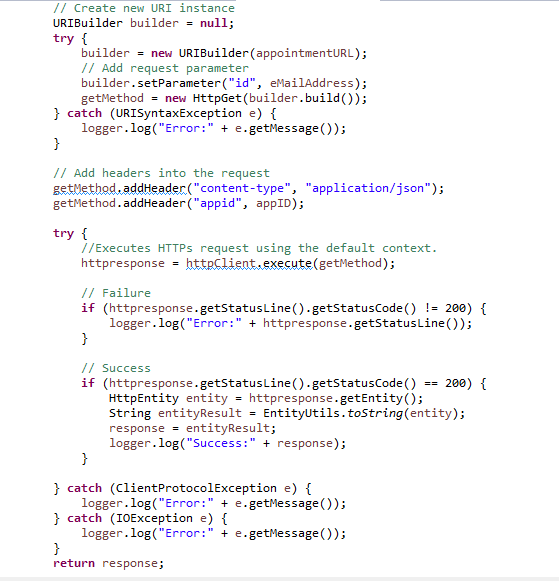
Create a new AppointmentClient Java class with a handler method. AWS Lambda invokes this method at runtime to process the incoming request.
All the business logic for this function should go in this handler method. This java class gets configuration details from the environment variable and uses the JKS file and password phrase for 2-way authentication. The code is listed below.

Step 3 : Call API
Additional code is added in the myHandler method to accomplish the below.
Build a new request object with request parameters, headers and call the Appointment API. The response can be handled in the Lambda function or can be passed on to the calling interface. In our example, Lambda function sent back the response to AWS Lex for further processing.
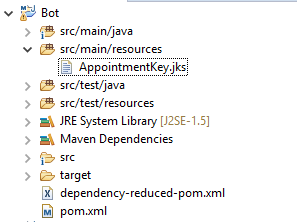
Step 4 : Add the .jks file
The Java Key Store file (AppointmentKey.jks) has to be bundled as part of the binary file so it is added to the resource folder
Step 5 : Test the functional locally
Test the Lambda function by running it locally on Eclipse (Run As -> Run Configurations -> Java Application). Set the environment variables before running the application.
The program should be able to establish the connection, call the API successfully, and display the response in the console.
Step 6 : Build the binary file
Once you successfully test the application, build the binary file (jar file) using maven build commands. To include all the dependent jars in the bundle, use the maven-assembly plugin with the “jar-with-dependencies” descriptor. Add below to pom.xml file.

Step 7 : Create a Lambda Function
Login to your AWS console and select Lambda services. In the Lambda console, click on “Create Function”

On the next page, create the lambda function with “Author from scratch”, providing function name and Java 8 as runtime. Create function by retaining other information with default values.

Step 8 : Upload the binary File
Upload the jar file to AWS Lambda. AWS Lambda code editor does not support Java 8 runtime so you will not be able to make any changes to the code on the Lambda console. For files smaller than 10 MB, you can directly upload from the console. For files larger than 10 MB, you have to first upload the jar file to AWS S3 and then to Lambda.

Step 9 : Add environment configuration
Add environment variables in AWS Lambda and save.

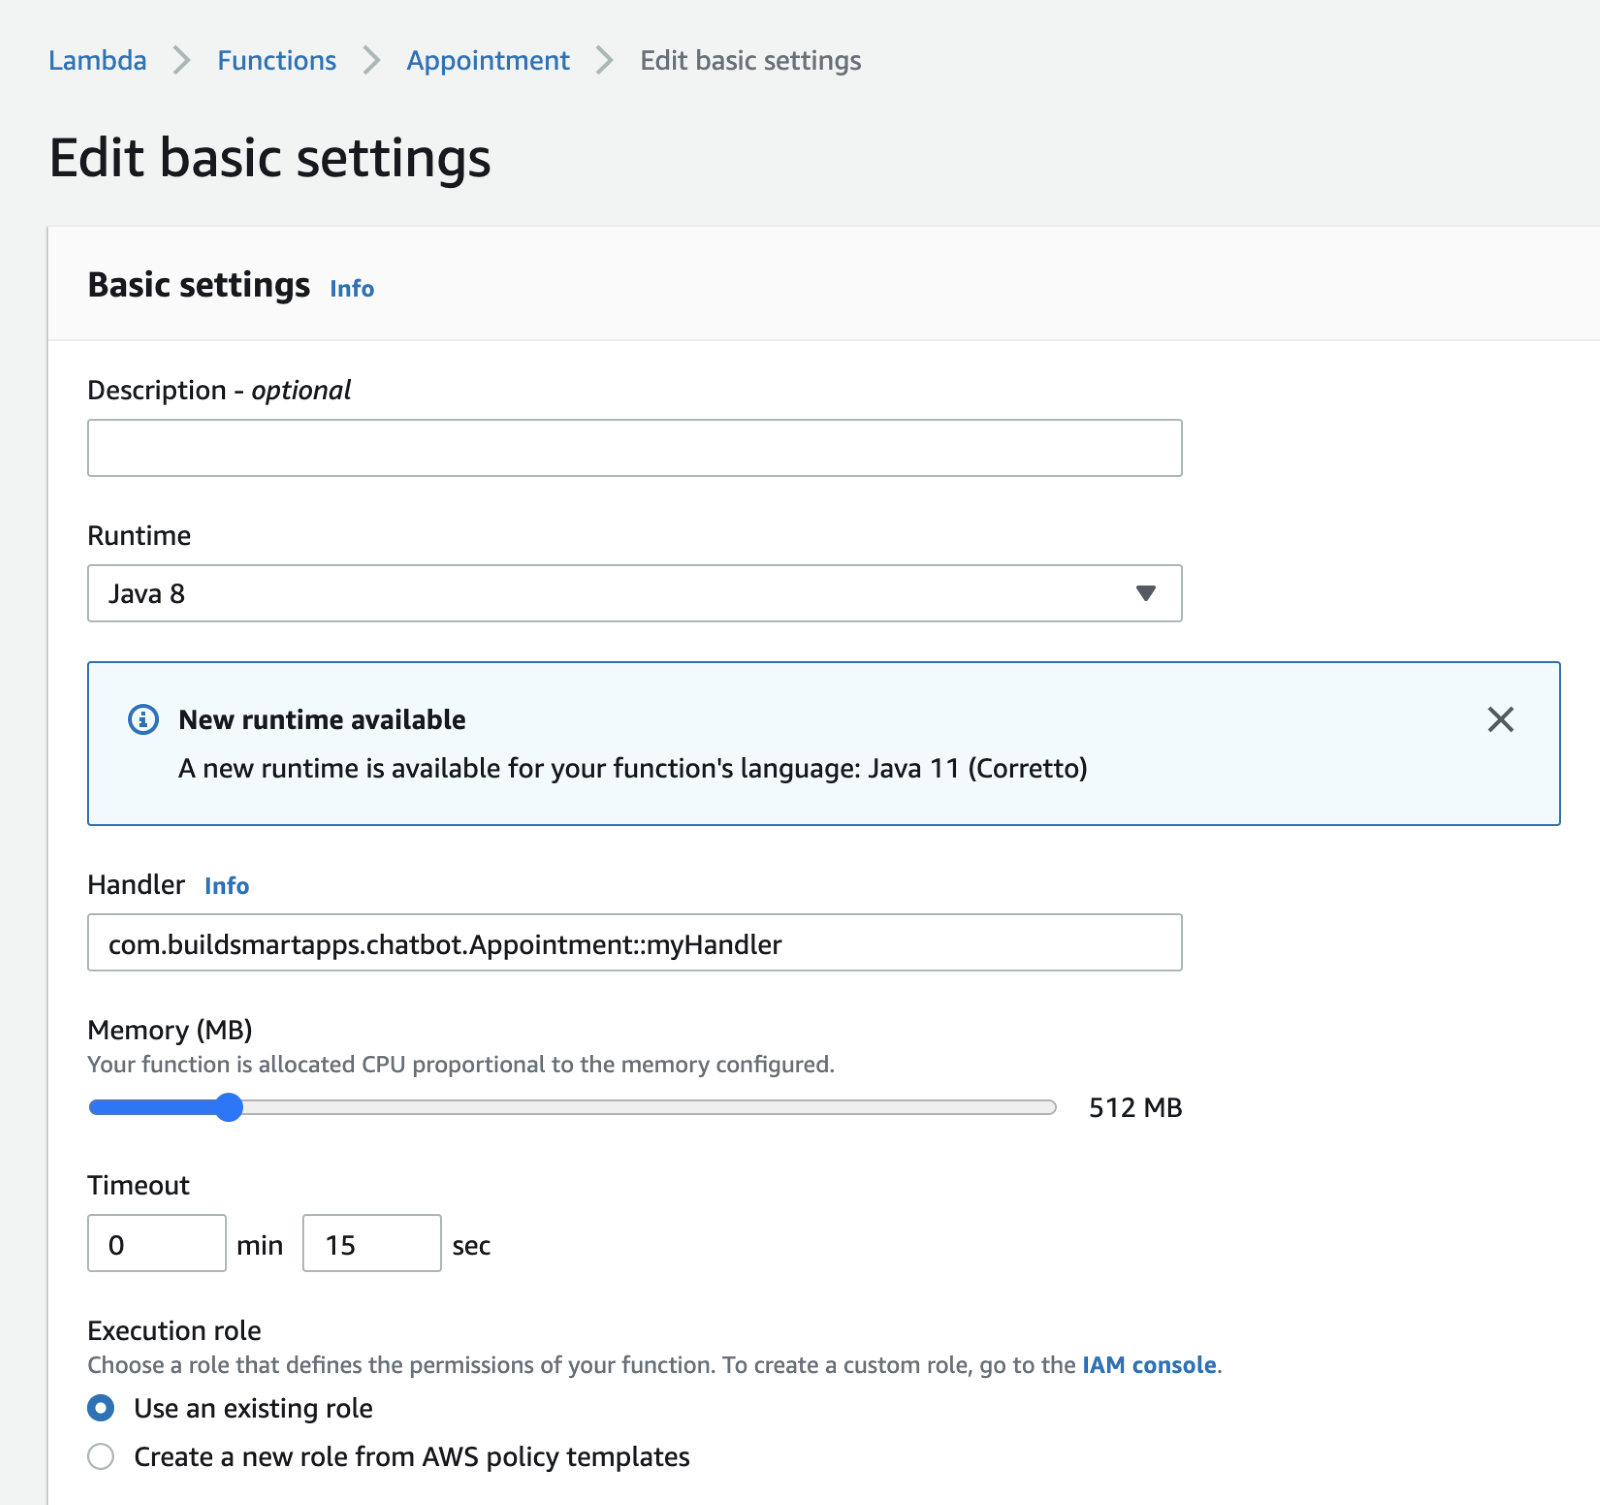
Step 10 : Configure Lambda runtime to invoke your handler method
You can tell the Lambda runtime which handler method to invoke by setting the handler parameter on your function’s configuration.
The following handler formats are supported in Java: package.Class::method
Add the following is the configuration that has to be done for this project and save the function. “com.buildsmartapps.chatbot.Appointment::myHandler” calls the Handler method defined in main java.
Accept the default value for the memory.
Note: You pay for the time that your function code runs multiplied by the amount of memory used. For your production function, test your function with different memory settings to see how it affects performance, and find the right balance between cost and speed for your use case.
Step 11 : Create a Test event for your Lambda Function
Once you define and configure your Lambda function, you can test the function directly from the Lambda console before integrating it with the consumer application.
To create a test, select “Configure test events” from the drop-down menu and click Test.

Create a new test using the “hello-world” template, provide the event name, and input the function. By default, the input content is in JSON format. Since our function accepts String as input, we are sending the email ad

Step 12 : Test your Lambda Function
Once the test event is created, run the test by selecting the appropriate test even.

The test event calls the Lambda function with the inputs given and displays the results in the console.

Conclusion:
JKS file has been bundled as part of the binary file for simplicity. However, for production use JKS file should be securely stored and made accessible to all Lambda functions. AWS Systems Manager Parameter store is a good option for this. We have used Java to implement Lambda function but the same can be implemented in other programming languages supported by AWS Lambda.